How To Compile Wireshark
Let’s allow your protocol to be recognized in Wireshark
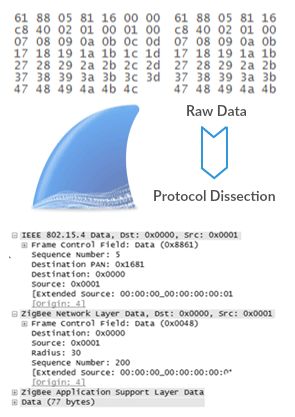
Sewio provides Wireshark Protocol Dissector Development Service.
We will create protocol dissector according to your specific needs as a plugin or as native part of Wireshark. Normally, you would need to develop your own protocol dissector quite rarely, so learning the dissector development from the scratch might be not very efficient way. Let’s put this development to our hands and gain from our expertise.
Partnering with Sewio reduced our development time when creating a Wireshark dissector tool for our wireless protocol, SNAP. Their level of expertise in analyzing and capturing 802.15.4 packets accelerated our time to market, eliminated unexpected complexities and provided our team with a very valuable tool.
Introduction
This tutorial describes, how to compile Wireshark on the Windows operation system. We used Windows 7 32-bit operation system. All information below are obtained from Wireshark Developer’s Guide and from README files.
Step 1: Install Microsoft C compiler and SDK
We use full version of the Microsoft Visual Studio 2010. There is also free alternative Visual C++ 2010 Express Edition. For more information please follow this link. The Visual studio should be 2010 or greater.
Step 2: Install Cygwin
Download Cygwin from this page. Run Cygwin setup and at the “Select Packages” page, you’ll need to select some additional packages which are not installed by default. Navigate to the required Category/Package row and, if the package has a “Skip” item in the “New” column, click on the “Skip” item so it shows a version number for:
- Archive/unzip
- Archive/zip
- Devel/bison
- Devel/flex
- Interpreters/perl
- Utils/patch
- Web/wget
Step 3: Install Python
Get the Python installer from here and install it into default location.
Step 4: Install Subversion Client
TortoiseSVN is a native Windows graphical Subversion client for Windows. You can download it from tortoisesvn.net .
Step 5: Install and Prepare Sources
- Open Windows Explorer and right click on drive C:\
- In context menu select “SVN checkout“.
- URL of repository: “
http://anonsvn.wireshark.org/wireshark/trunk/“ - Checkout directory:
C:\wireshark - TortoiseSVN might ask you to create this directory – say YES
- TortoiseSVN starts downloading the sources
After the download is complete let’s edit config.nmake located in C:\wireshark\config.nmake. We need to edit some definitions (Use CTRL+F for find them out ):
VERSION_EXTRAGive Wireshark your “private” version info, e.g.: -myprotocol123 – to distinguish it from an official release!MSVC_VARIANTMake sure the variant for your compiler is uncommented, and that all others are commented out. In my case, i used Microsoft Visual Studio 2010, so i uncomment this line:MSVC_VARIANT=MSVC2010and comment all the others (use#). This is in my file:# “Microsoft Visual C++ 2008 Express Edition”
# Visual C++ 9.0, _MSC_VER 1500, msvcr90.dll
#MSVC_VARIANT=MSVC2008EE# “Microsoft Visual Studio 2010”
# Visual C++ 10.0, _MSC_VER 1600, msvcr100.dll
MSVC_VARIANT=MSVC2010# “Microsoft Visual C++ 2010 Express Edition”
# Visual C++ 10.0, _MSC_VER 1600, msvcr100.dll
#MSVC_VARIANT=MSVC2010EE
Step 6: Prepare cmd.exe
- Run command line as Administrator.
- Than you create a little win script (e.g. “prepare.bat”) and save it to
C:\wireshark. - Here is the script code: @echo off
echo Adding things to the path…
set PATH=%PATH%;.
set PATH=%PATH%;c:\cygwin\binecho Setting up Visual Studio environment…
call “c:\Program Files\Microsoft Visual Studio 10.0\VC\vcvarsall.bat”set WIRESHARK_TARGET_PLATFORM=win32
title Command Prompt (VC 2010) - line
call c:\Program Files\Microsoft Visual Studio 10.0\VC\vcvarsall.batdepends on version compiler and exact location ofvcvarsall.bat.For more information which file belong to your compiler, follow this link - line with
set WIRESHARK_TARGET_PLATFORM=win32execute 32-bit binaries for target platform. For 64-bit binaries useset WIRESHARK_TARGET_PLATFORM=win64 - Here is table for some cases of operation system and target platform:
Your processor architecture Target architecture Value of WIRESHARK_TARGET_PLATFORM vcvarsall.bat argument x86, x64 x86 win32 ”x86? (default) x86, x64 x64 win64 ”x86_amd64? x64 x64 win64 ”amd64? - example of code for 32-bit operation system and for 64-bit target platform: set WIRESHARK_TARGET_PLATFORM=win64
call “c:\Program Files\Microsoft Visual Studio 10.0\VC\vcvarsall.bat” x86_amd64 - run prepared script.
Step 7: Verify installed tools
- in the prepared command line, enter following command nmake -f Makefile.nmake verify_tools
output should looks like this:
Copyright (C) Microsoft Corporation. All rights reserved.Checking for required applications:
cl: /cygdrive/c/Program Files/Microsoft Visual Studio 10.0/VC/BIN/cl
link: /cygdrive/c/Program Files/Microsoft Visual Studio 10.0/VC/BIN/link
nmake: /cygdrive/c/Program Files/Microsoft Visual Studio 10.0/VC/BIN/nmake
bash: /usr/bin/bash
bison: /usr/bin/bison
flex: /usr/bin/flex
env: /usr/bin/env
grep: /usr/bin/grep
/usr/bin/find: /usr/bin/find
peflags: /usr/bin/peflags
perl: /usr/bin/perl
C:\Python27\python.exe: /cygdrive/c/Python27/python.exe
sed: /usr/bin/sed
unzip: /usr/bin/unzip
wget: /usr/bin/wget
Step 8: Install Libraries
- Type this to command line
nmake -f Makefile.nmake setup. It downloads libraries using wget and installs them. This may take a while. - If you want in future compile Wireshark to 32-bit platform or 64-bit platform, go to Step 6 and change
WIRESHARK_TARGET_PLATFORM. Next you should Install Libraries again and continue from this step.
Step 9: Distclean Sources
- You must distclean your sources before building. This step you should do every time before Wireshark compilation takes place.
nmake -f Makefile.nmake distcleanis for cleanup the Wireshark sources
Step 10: Build Wireshark
- Let’s create an another little script, just two lines. Named it for example run_script.bat and save it to C:\wireshark. nmake -f Makefile.nmake distclean
nmake -f Makefile.nmake all - After you run this script, you might need to wait for a while (approximately 10 minutes).
- When this process is finished, you may find the Wireshark executable in C:\wireshark\wireshark-gtk2\wireshark.exe.
Step 11: Create a Wireshark Installer (Optional)
- Download NSIS and install
- You may check the MAKENSIS setting in the file config.nmake of the Wireshark sources. Note that the 32-bit version of NSIS will work for both 32-bit and 64-bit versions of Wireshark
- Download Runtime redistributable:
- If you’ve closed command line, prepare cmd.exe from Step 6
- Type this code
nmake -f Makefile.nmake packagingfor build Wireshark installer - In this folder
C:\wireshark\packaging\nsis\you should findwireshark<your version>.exe